Using Green Screen in iMovie 09
Green Screening allows you to go to places that you can only dream of and do things you always wanted to do without really doing them!
The Green Screen option in iMovie is one such tool. You may never have visited the Eiffel Tower or sailed the oceans on a Tall Ship but with this technique you can pretend to others that you were there.
In Green Screening a subject is shot in front of a green/blue screen. (Any solid colour will work - a clutter free plain white/ magnolia wall works well - but blue/ green colours are the most common.) iMovie then removes this colour from your movie clip, and fills in the empty space with the picture from another video clip, or a stillpicture. A good example of this is the weather report onTV.
The example below can be achieved really quickly and describes the process that a class of Year 3/4 pupils followed to sail and report as Explorers on Christopher Columbus' Ship The Nina.
What do you need:

 • A Mac with iMovie 09
• A video camera - use the built in camera and the PhotoBooth app.
• A green screen - a sheet of green fabric, paper or plastic.
Green Screening allows you to go to places that you can only dream of and do things you always wanted to do without really doing them!
The Green Screen option in iMovie is one such tool. You may never have visited the Eiffel Tower or sailed the oceans on a Tall Ship but with this technique you can pretend to others that you were there.
In Green Screening a subject is shot in front of a green/blue screen. (Any solid colour will work - a clutter free plain white/ magnolia wall works well - but blue/ green colours are the most common.) iMovie then removes this colour from your movie clip, and fills in the empty space with the picture from another video clip, or a stillpicture. A good example of this is the weather report onTV.
The example below can be achieved really quickly and describes the process that a class of Year 3/4 pupils followed to sail and report as Explorers on Christopher Columbus' Ship The Nina.
What do you need:
• A video camera - use the built in camera and the PhotoBooth app.
• A green screen - a sheet of green fabric, paper or plastic.
-
First of all prepare and securely fix your Green Screen.
A green background is commonly used.
You can purchase large green pieces of fabric for this purpose but you could use any green background for example a cheaper method would be a green sheet of paper or a piece off a green bin-liner - make sure there are as few creases, folds, shadows or glare on the Green Screen because this causes the 'invisible man' effect and fuzzy edges.
-
Next create your movie in PhotoBooth - refer to the ‘Green Screening in PhotoBooth’ ‘howto’ guide in the Resources section. Pupils worked in groups and videoed themselves dressed up as Explorers reading a prepared script about their life as an explorer aboard The Nina.


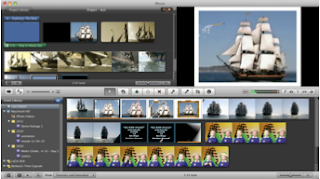
6. Next, in the Events area of iMovie select your Green Screen movie, drag and place this directly on top of the Tall Ships video already in the Project area.
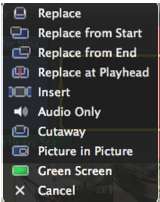
7. Notice how as soon as you place it on the top of the video an
extra menu pops up - choose Green Screen from the menu
options.
Check out the Resources Section for more ideas for using Espresso on a Mac.
Why not film your class in front of the Egyptian pyramids, have them report the progress of the Great Fire of London surrounded by the burning timbers of London, comment on the lives of endangered species live from the rainforest of Borneo.......
Attribution:
Background film (Tall Ships) a film by James B./TallSky Video - YouTube - copyright 2008 Music by Kevis MacLeod - Incompetech.com - Creative Commons Attribution 3.0
Thanks to Skirlaugh Primary School - East Riding
No comments:
Post a Comment